Autotype Exposure Calculator: How to Read the Film That Nobody Explains
The Autotype (MacDermid) exposure calculator is five exposures in one sheet of film. How the factor columns work, how to read the color change, what the resolution targets tell you, and what to use if you don't own one.
The Autotype exposure calculator is one of those tools that outlived its own instructions. The brand is now MacDermid Autotype, the film is still sold, and plenty of used ones float around shops and eBay — but the little illustrated booklet that came in the envelope is long gone from most of them. If you’re holding a sheet of film printed with five identical test images and a row of numbers (1.0 / 0.7 / 0.5 / 0.33 / 0.25), this guide is the manual.
It’s also worth understanding even if you never buy one, because its method — factor columns and color change — is a genuinely different way of finding exposure time than the 21-step wedge most guides describe. We’ll compare both at the end.
What the Autotype Calculator Actually Is
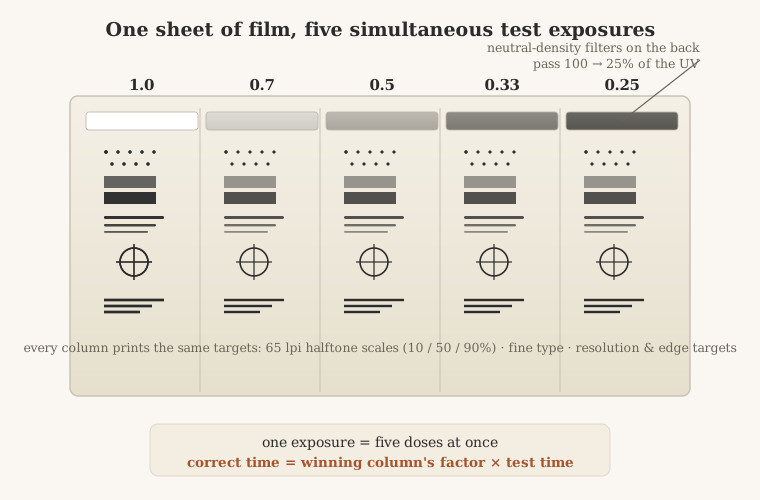
The calculator is a single sheet of film, about 5½ × 8 inches, printed with five identical columns of test images. Behind each column, on the back of the film, sits a neutral-density filter of a different strength. The filters pass 100%, 70%, 50%, 33%, and 25% of the UV light — those percentages are printed above the columns as factors: 1.0, 0.7, 0.5, 0.33, 0.25.
That one design choice is the whole trick: a single exposure under this film is really five simultaneous test exposures at five different doses. One burn, one washout, and you can read which dose was correct — instead of burning five separate test screens.
Each column carries the same set of targets:
- Halftone dot scales at 65 lines per inch, in 10%, 50%, and 90% tints, angled at 22°
- Fine sans-serif text in small point sizes (6, 10, and 14 pt)
- Resolution and edge targets for judging sharpness and picking a mesh angle that avoids sawtoothing
So the film answers two questions at once: how long to expose, and how much detail that exposure actually holds.
The Reading Method: Double, Expose, Watch the Color Change
Here is the procedure, the way the original booklet described it:
1. Estimate your exposure time, then double it. Whatever you think the correct time is — from experience, the emulsion datasheet, or a guess — expose the test screen for twice that. Doubling is deliberate: it guarantees the 1.0 column (full light) gets too much exposure, so the interesting answer is somewhere in the filtered columns.
2. Expose with the film in place, wash out, and dry. Handle the screen exactly like a production screen: same mesh, same emulsion, same coating, same drying. The test only tells the truth if everything except exposure time stays identical.
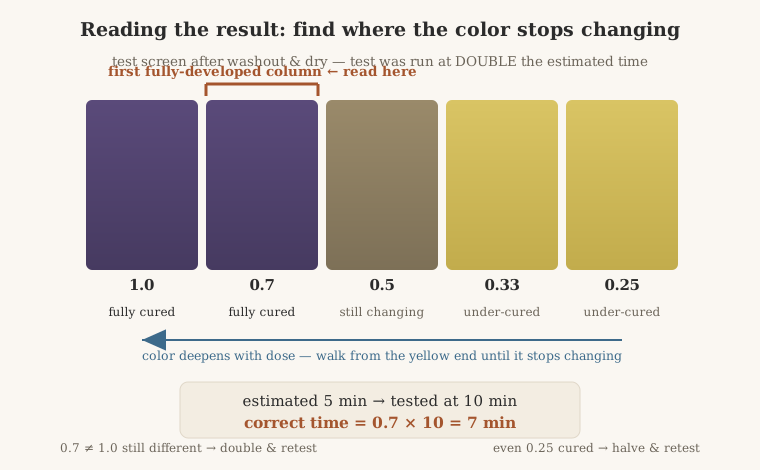
3. In white light, compare the columns by color. This is the part nobody explains. Diazo-sensitized emulsion changes color as it cures — the yellow tone fades with exposure. Read the columns like a gradient:
- Find the column where the color is fully developed — no further lightening compared to its denser-filtered neighbor.
- That column’s factor, multiplied by your (doubled) test time, is your correct exposure time.
Example: you estimated 5 minutes, so you ran the test at 10. After washout, the 0.7 column is the first one that shows full cure. Correct time = 0.7 × 10 = 7 minutes.
The two off-the-scale cases:
- The 0.7 and 1.0 columns still look different from each other → even full light at the doubled time wasn’t enough. The whole test was underexposed: double the test time and run it again.
- Even the 0.25 column is fully cured → the test was overexposed across the board: halve the test time and run it again.
Watch the method in action: nobody has filmed the Autotype film itself, but Chromaline’s applications specialist demonstrates the same factor-filter method on their Dual Exposure Calculator — estimate, double, read the best target, multiply:
Does the Color Trick Work on SBQ Photopolymer?
There’s a common misconception that the color-change reading only works on diazo emulsions. Diazo does have a true color change — that’s the classic case. But SBQ pure-photopolymer emulsions are readable too: they don’t change hue, yet underexposed photopolymer swells more during washout, and the swelling leaves a visible tonal difference between columns. KIWO’s own documentation points this out explicitly. The reading is subtler, so take extra care with drying before you judge, but the method still works.
The Second Job: Reading the Resolution Targets
Once the exposure column is picked, the same screen tells you what that exposure is worth in detail. This is where the calculator earns its keep beyond a plain step wedge:
- 10% dots (highlight): if these wash away, you’re losing highlight detail — overexposure or too much light scatter.
- 90% dots (shadow): if these fill in, shadow detail is plugging — underexposure, or emulsion too thick.
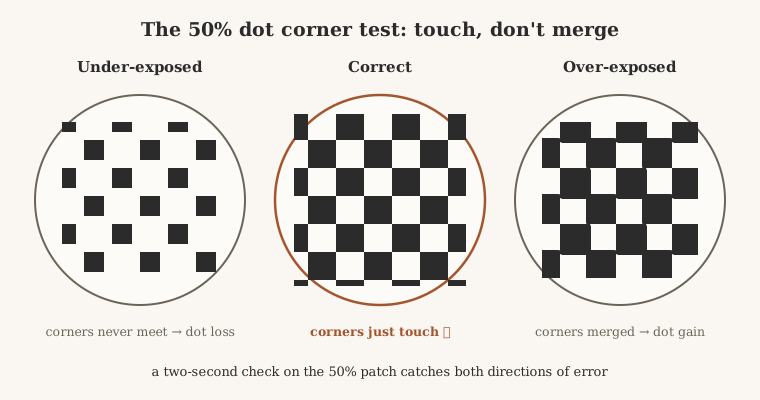
- 50% square dots — the corner test: at correct exposure, the corners of neighboring 50% square dots just touch. Corners failing to meet = dot loss (underexposure or scatter); corners merged into blobs = dot gain (overexposure).
The fine text and line targets do double duty: they show resolving power, and they tell you whether your film-to-mesh angle is inviting sawtoothing. If fine lines print ragged at an exposure that otherwise reads correct, the problem is mesh angle or count, not time — our sawtoothing guide goes deep on that.
Autotype vs. the 21-Step Wedge: Two Philosophies
The other mainstream tool is the Stouffer-style 21-step wedge, where you expose, wash out, and count how many steps stayed solid (seven solid steps is the classic target for many emulsions), then convert with a table or calculator. Honest comparison:
| Autotype factor film | 21-step wedge | |
|---|---|---|
| What you read | Color/tone change between columns | Count of surviving steps |
| Math | factor × test time | step number → conversion table |
| Detail check | Built-in halftone/text/resolution targets | None (it’s just a gray scale) |
| Best at | Fine detail work, halftones, dialing in | Quick go/no-go exposure checks |
| Cost | Mid-priced branded film | Cheap, widely cloned, free printables exist |
They don’t compete so much as complement: the wedge is faster for day-to-day checks; the factor film is better when detail quality matters. We walk through the wedge method — and the exact conversion math — in How to Find Your Exposure Time, and our Exposure Calculator Guide covers the other factor-filter designs (ExpoCheck, Chromaline Dual) plus the free tools.
If You Don’t Own One
Three routes, in order of cost:
- Free: our Exposure Time Calculator tool implements the wedge math and the factor-filter math in the browser, with a session log — pair it with any inexpensive 21-step film.
- Cheap: generic 21-step transmission wedges (Stouffer-pattern) sell for around $20 from multiple screen print suppliers.
- The real thing: MacDermid Autotype still lists the exposure calculator, and equivalents exist from KIWO (ExpoCheck) and Chromaline. Expect roughly $25–90 depending on brand and source. For shops running halftones daily, the resolution targets alone justify it.
Whichever film you use, record the result: mesh count, emulsion, coating, light source, distance, and the final time. Exposure settings are per-setup — a number found on one emulsion and lamp does not transfer to another. Re-test when any variable changes.
FAQ
What do the numbers 1.0 / 0.7 / 0.5 / 0.33 / 0.25 on the film mean? They’re the transmission factors of neutral-density filters behind each column — that column receives that fraction of the full UV dose. One exposure under the film equals five simultaneous test exposures at 100%, 70%, 50%, 33%, and 25%.
Why do I double my estimated exposure time for the test? Doubling guarantees the unfiltered column is overexposed, so the correct answer lands inside the filtered columns. If the 0.7 and 1.0 columns still differ after the test, the whole test was underexposed — double again and repeat.
Does the color-change reading work with SBQ photopolymer emulsion? Yes, though it’s subtler. Diazo emulsions visibly change hue as they cure; SBQ photopolymers don’t, but underexposed photopolymer swells more in washout and shows a tonal difference between columns. Dry the screen before judging.
What does the 50% dot corner test tell me? At correct exposure, the corners of neighboring 50% square halftone dots just touch. Gaps between corners indicate dot loss (underexposure or light scatter); merged corners indicate dot gain (overexposure).
Is the Autotype calculator still being made? The Autotype brand is now MacDermid Autotype, and the calculator (or current equivalents) remains available through their dealer network; KIWO and Chromaline make comparable factor-filter calculators. Used Autotype films are common on the secondary market — the film doesn’t wear out if kept flat and clean.
Do I need a calculator if I already know my exposure time? Only until something changes: new emulsion batch, new mesh, aging lamp, different coating. The calculator is how you re-find the time in one burn instead of five.