Ink Viscosity for Screen Printers: How to Measure It, Read It, and Adjust It
Viscosity runs your print quality, but 'thick' and 'thin' aren't numbers. Flow cups vs. rotational viscometers, the right measuring procedure, real working ranges for water-based and plastisol inks, and how to adjust ink without wrecking it.
Every ink problem that shows up on the shirt — weak coverage, bleeding edges, screens clogging mid-run, prints that look different at 4 pm than they did at 9 am — traces back to how the ink flows. And yet most shops describe ink the way medieval doctors described fever: “too thick,” “too thin,” “feels off.” This guide is about replacing that with a number you can write down, plus the honest limits of what that number can tell you.
What Viscosity Actually Does in a Print
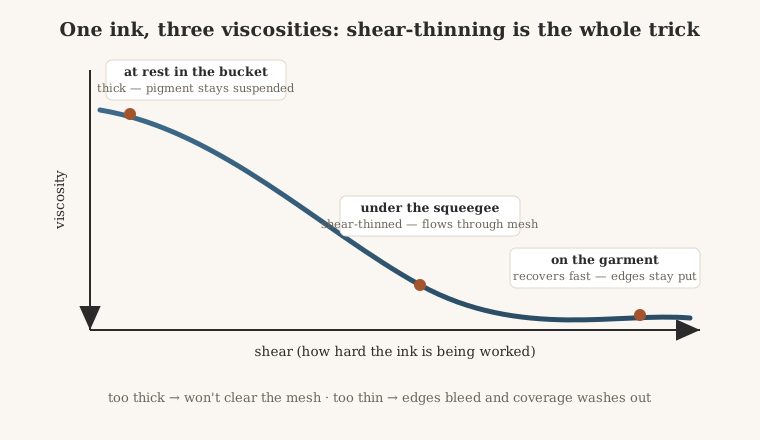
Screen printing ink is engineered to be shear-thinning (thixotropic): thick at rest in the bucket, thin under the squeegee’s shear, thick again on the garment. That behavior is the whole trick:
- At rest — high viscosity keeps pigment suspended and stops ink dripping through the mesh onto your platen between prints.
- Under the squeegee — shear drops the viscosity so ink flows through the mesh openings.
- On the garment — viscosity recovers fast, so the dot or edge stays where it landed instead of spreading.
When the balance breaks, the symptoms are predictable. Too thin: ink spreads past the stencil edge (feathering), fine lines fatten, coverage looks washed out, ink mists or drips through the screen between strokes. Too thick: ink won’t clear the mesh, prints look rough and speckled, you fight the squeegee, and on an automatic the screen may not even release cleanly.
Why “Stir It and Feel It” Stops Working
Two properties make ink viscosity slippery to judge by hand:
The number depends on how hard you measure it. A non-Newtonian ink reads differently at different shear rates. The same bucket gives one answer to a slow-stirred spatula, another to a spinning spindle at 20 rpm, another at 100 rpm. A viscosity reading without its test conditions is meaningless — “5,000 cP” says nothing until you add “spindle 4, 20 rpm, 25 °C.”
Temperature moves the number. Ink thins as it warms. A drum mixed at 18 °C in the morning and measured again at 28 °C in the afternoon is not the same ink, and on press the ink keeps warming from friction and flash units. Measurements without temperature are guesses.
That’s the case for measuring properly: not because the instrument is magic, but because it fixes the conditions so two readings can actually be compared — today vs. yesterday, your shop vs. the ink maker’s datasheet.
Tool 1: The Flow Cup (Zahn and Friends) — Cheap, Fast, and Limited
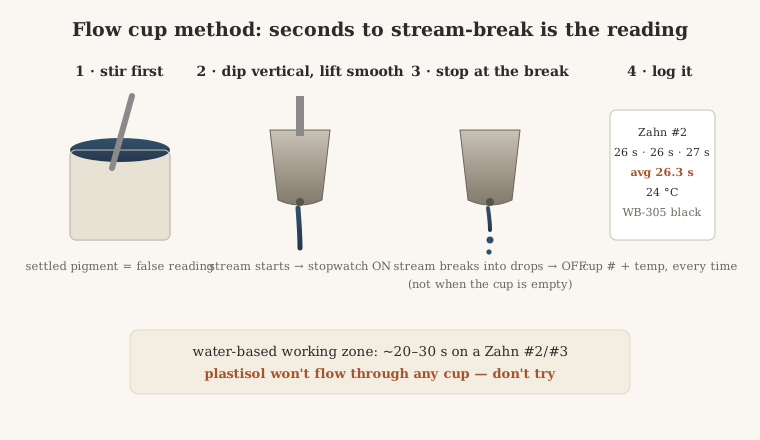
The flow cup is the pressroom classic: a stainless cup with a precision hole in the bottom. You dip it, lift it, and time how long the stream takes to break. That drain time in seconds is your reading.
The procedure that makes readings comparable (skip any step and you’re measuring your own sloppiness):
- Stir the ink thoroughly first — settled pigment and skinned surface give false readings.
- Dip the cup vertically, submerge completely, let it fill.
- Lift smoothly; start the stopwatch the moment the stream starts.
- Stop when the stream breaks into drops, not when the cup empties.
- Repeat three times and average. Clean the cup immediately — dried ink in the orifice ruins every future reading.
Reading it. Flexo shops running water-based inks typically work around 20–30 seconds on a Zahn #2 or #3 cup, and one published flexo study held its ink at 30 ± 1 s (Zahn #2, 22 °C) for an entire trial. Cups come in numbered orifice sizes covering different ranges — a #2 covers roughly 15–200 cP — so always record the cup number with the seconds.
The honest limitation: flow cups only work for inks thin enough to flow through a small hole. That’s water-based inks, some discharge bases, adhesives, and washup solutions. Plastisol will not run through a Zahn cup — it’s far too viscous. If you print plastisol only, a cup tells you nothing; skip to the next section or the spatula test.
Tool 2: Rotational Viscometers — Real Numbers, Real Rules
Rotational instruments spin a spindle in the ink and measure the resistance torque, reporting viscosity in centipoise (cP) — or, for the Stormer/KU type common in paint and ink QC, in Krebs units under ASTM D562. This is what ink manufacturers’ datasheets use.
Two rules keep rotational numbers honest:
- Same spindle, same speed, same temperature — every time. Because the ink is shear-thinning, 6 rpm and 60 rpm give different cP on purpose. Pick one set of conditions per ink family, write them on the log sheet, never improvise.
- Let the reading settle. Thixotropic ink keeps thinning while the spindle spins; take the value after the same fixed time (30 or 60 seconds) each round.
Working ranges worth knowing (typical published figures, measured under each maker’s own conditions — treat as orientation, not gospel): water-based textile inks roughly 300–2,000 cP, plastisol roughly 1,000–10,000 cP, specialty high-density inks far above that. What matters in practice is not the absolute number but consistency: the same ink measured the same way should land in the same band every batch. A batch that reads 30% off its norm will print differently even if you can’t say why.
Tool 0: No Instrument? Standardize the Spatula
If there’s no budget for instruments yet, make the free method reproducible instead of vibes: same spatula, same bucket temperature, same motion — lift the spatula and watch the ribbon. Note how long the ribbon runs before it breaks and how the last drip hangs. It’s subjective, but written down (“WB-305 black, 21 °C, ribbon ~3 s, clean break”) it becomes a baseline you can compare tomorrow against. The day a batch feels wrong, your log tells you whether it is wrong.
Adjusting Ink Without Wrecking It
- Too thick → add reducer/curable thinner in small steps, 0.5–1% by weight at a time, mixing fully and re-testing between additions. Past the maker’s maximum (often 5%), you’re trading printability for cured-film strength and wash fastness.
- Too thin (water-based) → the maker’s thickener, 1–2% at a time. Acrylic gel or alginate types are standard. In a pinch, leaving the lid off for 20–30 minutes evaporates water and firms the ink — a field fix, not a formulation strategy.
- Never force it. If thick ink won’t pass a fine mesh, the answer is more reducer or coarser mesh — not more squeegee pressure. Pressure just bends blades and fatigues screens (see how a squeegee really works).
- Re-test after every adjustment, and after the ink has been on the screen a while — water-based ink thickens in the screen as water flashes off, which is why the first print and the fiftieth don’t match on hot days.
Whatever you adjust, log it: ink, batch, temperature, instrument and settings, reading, what you added. The log is what turns one person’s feel into a shop standard.
Do You Need to Buy Anything?
- Just starting, water-based only: a Zahn-style #2 cup ($20–60) plus a stopwatch and a thermometer. Enough to catch bad batches and repeat good ones.
- Mixed inks, contract work, or mixing Pantone matches to a spec: an entry rotational viscometer pays for itself the first time a client disputes a rerun. Look for one that reports cP at defined rpm with a temperature probe.
- Plastisol-only hobby shop: honestly, neither — the spatula log plus careful reducer discipline covers you until volume justifies the instrument.
FAQ
What viscosity should screen printing ink be? There’s no single number — it depends on ink type, mesh, and the instrument. Published working ranges: water-based textile inks roughly 300–2,000 cP, plastisol 1,000–10,000 cP. On a Zahn #2 cup, water-based inks typically run 20–30 seconds. Consistency between batches matters more than hitting anyone’s number.
Can I use a Zahn cup for plastisol? No — plastisol is too viscous to flow through a cup orifice. Flow cups are for water-based inks, adhesives, and other thin fluids. For plastisol, use a rotational viscometer or a standardized spatula test.
Why do two viscosity readings of the same ink differ? Usually test conditions: different spindle speed, temperature, or stir state. Shear-thinning inks read lower at higher shear, and all inks thin when warm. Fix spindle, rpm, time, and temperature before blaming the batch.
How do I thicken water-based ink? The ink maker’s thickener (acrylic gel or alginate), 1–2% at a time, mixed fully and re-tested. Leaving the lid off 20–30 minutes works as a field fix by evaporating water.
How do I thin plastisol? Curable reducer in 0.5–1% steps, re-testing between additions; stay under the manufacturer’s maximum (often around 5%) or cure and wash fastness suffer.
Does ink viscosity change during a print run? Yes — water-based inks thicken on the screen as water evaporates, and all inks thin as they warm from friction and flash units. Re-check mid-run on long jobs.