How to Sharpen a Screen Printing Squeegee — and How to Know It's Actually Sharp
A shop-floor guide to squeegee sharpening: when to grind, machine vs. hand methods, and an eight-point acceptance checklist with objective pass/fail tests — light test, fingernail, cotton swab, loupe, straightedge, calipers, durometer, and the press test. No 'feel' required.
Our shop has a problem we’ve never fully solved.
After a squeegee is sharpened, whoever did the job runs a finger along the edge — smooth, no drag, no catches — and calls it done. The result: same grinder, same program, same motions, and some people’s blades print perfectly while others’ streak on the first impression and have to come off the press and go back to the grinder. The difference lives entirely in that final fingertip judgment, and fingertips can’t be documented, taught, or handed down.
This guide does three things: understand the material (every sharpening rule follows from it), compare the sharpening methods, and — the real point — translate “sharp enough” into eight objective checks that any operator can perform and get the same answer. Every check below is spelled out step by step.
First, Know Your Material: What the Blade Actually Is
We run RKS blades, and I had honestly never looked into what they’re made of. It turns out to matter, because every rule in this article falls out of the material’s properties.
Screen printing squeegees come in only three materials:
| Material | Solvent resistance | Abrasion resistance | Price | Status |
|---|---|---|---|---|
| Natural rubber | Poor | Poor | Lowest | Largely obsolete |
| Neoprene | Moderate | Moderate | Mid | Fading out |
| Polyurethane (PU) | Good | Good | Highest | The standard, especially on automatics |
Our RKS blades are a two-component system whose printing edge is Vulkollan® — a polyurethane made under license from Bayer, produced by only a handful of licensed manufacturers worldwide. Most squeegee-grade polyurethane in the industry is MDI-based polyester PU, the most abrasion-resistant family of urethanes.
Memorize three properties of polyurethane, and you can derive every sharpening rule yourself:
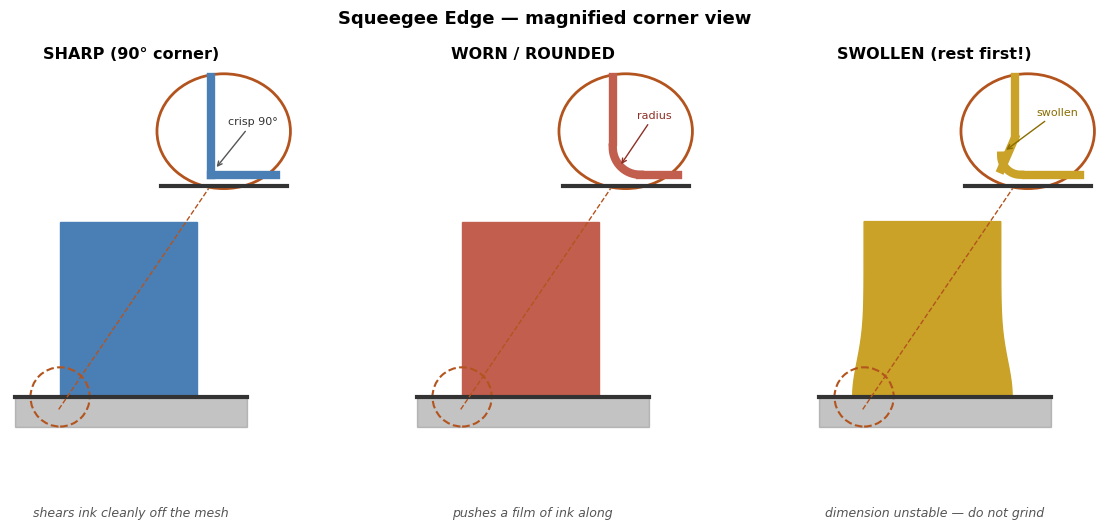
- It absorbs solvent and swells — so a blade must rest and shrink back before you grind it (12–48 hours).
- It has a low softening point and hates heat — so grinding must never generate heat, or the edge melts instead of cutting.
- It’s an elastomer and takes a “set” — continuous pressure and heat curl it, which is why blades get rotated and rested.
When to Sharpen: Two Signals, in Order
We don’t run a fixed sharpening schedule. Two signals trigger a grind:
Signal one: touch. The operator feels the edge — pitting, roughness, loss of smoothness means it’s time.
Signal two: the print. Vertical streaks (“blade lines”) in the printed film mean the edge already has nicks.
Note the order: touch comes first, print defects come second. By the time the print shows lines, bad parts have already gone downstream. Our back-end inspectors catch this and flag it — but that’s containment, not prevention.
There’s a third check that’s earlier than touch and needs zero experience: the light test (section 3.1 — it works before sharpening as well as after).
One iron rule before anything else: never sharpen a blade that just came off the press. A solvent-swollen edge is oversized — grind it today and the geometry you cut is gone once the blade dries and shrinks. Clean the blade, lay it flat, rest it 12–48 hours (softer durometers absorb more solvent and need longer), then grind. [Sources: APOLAN technical literature; Deco Tech technical bulletin]
How to Sharpen: Machine Sets the Geometry, Hands Finish the Edge
Our actual setup
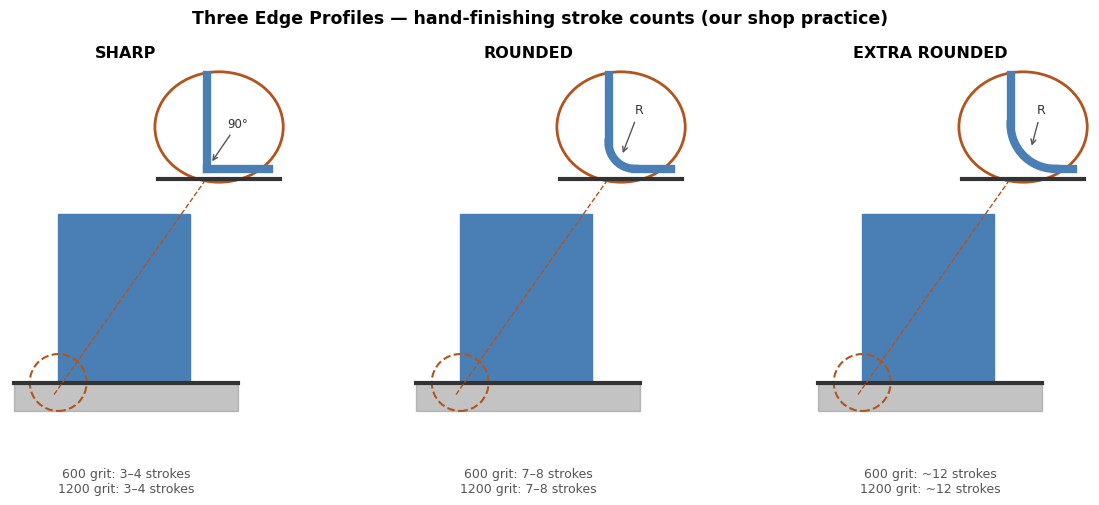
A wheel-type grinder with a coarse wheel and a fine wheel, programmable — for example, five coarse passes then three fine passes, run automatically. But the machine’s work isn’t the finished edge. Even off the fine wheel, the edge isn’t smooth enough. So we’ve always hand-finished afterward:
- 600-grit sandpaper to true up the flat of the edge,
- 1200-grit on the edge itself,
- sandpaper dampened with a little screen-printing thinner, as a final polish.
And because different artwork wants different edges, we finish to three profiles — each with its own stroke count:
How the wider industry does it
- Diamond-wheel sharpeners are the benchmark for consistency: no more than 0.05–0.10 mm removed per pass, end-to-end edge height tolerance around ±0.15 mm. [Source: RB Digital sharpener specifications]
- The two-stage grit strategy — coarse (60–120 grit) to remove damage, fine (160–300 grit) to bring up the edge — is industry standard [Source: APOLAN]. Our machine-plus-600/1200 routine is really an extended version of the same idea, with the finishing taken further.
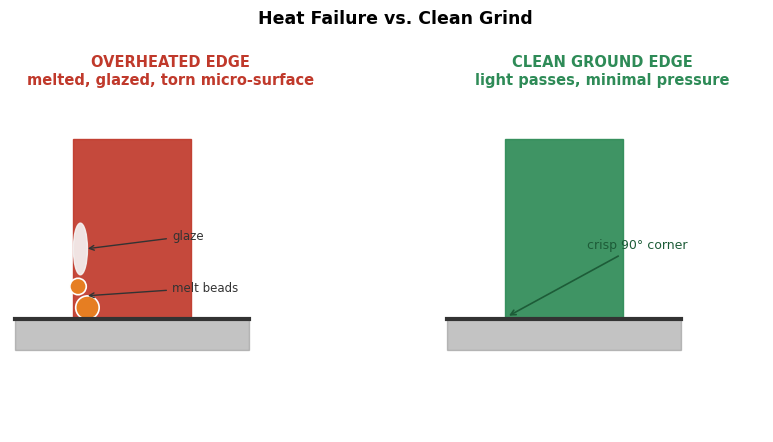
- Heat is the number-one enemy. A shiny, sticky-looking edge is glazed — melted, not ground. An aged blade will melt onto the wheel or chip at the edge; that’s not a technique problem, it’s the material telling you it’s at end of life. [Source: RB Digital; Screen Printing Magazine]
How to Know It’s Sharp: Eight Checks, Each Taught Step by Step
This is the heart of the article. Overview first, then each check in detail. The goal: someone who has never sharpened a blade can follow these steps and reach the same verdict as a veteran.
| # | Check | Tool | Cost | Pass criterion |
|---|---|---|---|---|
| 1 | Light test | Glass plate + lamp | ~$0 | No light under the edge, full length |
| 2 | Fingernail test | Your nail | $0 | No catches when dragged across |
| 3 | Cotton swab test | Cotton swab | ~$0 | No fibers snagged |
| 4 | 10x loupe | Jeweler’s loupe | A few dollars | No nicks, glaze, tears, or melt beads |
| 5 | Straightness | Straightedge + feeler gauges | Low | < 0.08% of length |
| 6 | Height consistency | Calipers | Low | ±0.15 mm end to end |
| 7 | Hardness | Shore A durometer | Shop already owns one | Within ±3 of rating |
| 8 | Press test | Eyes | $0 | No ink film, no streaks |
3.1 The light test (most important, cheapest, do it first)
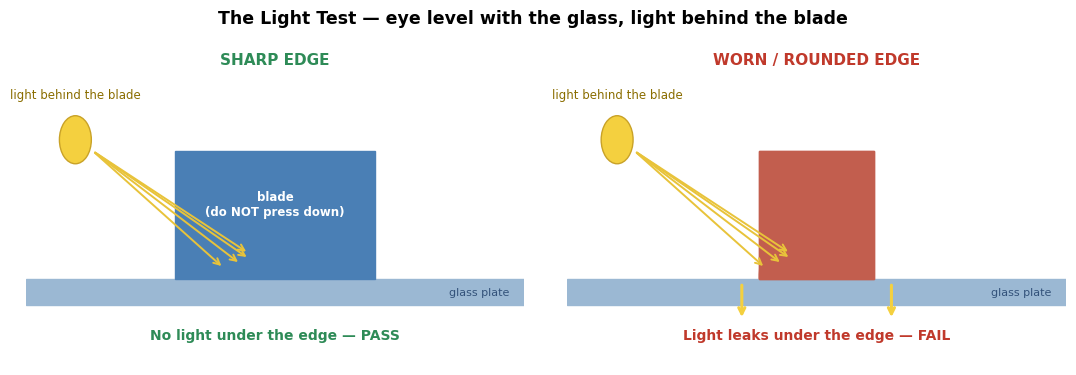
Principle: a sharp edge is a straight line — it seats flush against a flat surface. A rounded edge is an arc — it rocks on the middle and light leaks through.
Steps:
- Get a flat glass plate (or any verified-flat surface), clean it.
- Lay the blade edge-down on it, resting under its own weight — do not press it down; pressing hides everything.
- Put a light source behind the blade (a desk lamp or phone flashlight), crouch so your eyes are level with the glass, and look along the edge.
- Scan the full length.
Pass: no slit of light anywhere under the edge. Fail: light leaks through at some section — that section is rounded or hollow. The leak tells you exactly where the problem is — mark the back of the blade there and rework just that section.
Use it before sharpening too: it catches wear earlier than fingertips do. Worth knowing: the SMT (electronics solder-paste printing) industry has industrialized this exact method — automated inspection machines use a backlight and camera to rate squeegee edges to ±0.01 mm. Same principle, machine instead of eyes. [Source: SMT squeegee inspection equipment specifications]
3.2 The fingernail test (a zero-cost burr detector)
Principle: a machining-industry rule of thumb — burrs larger than 0.05 mm can be felt with a fingernail. Your nail is effectively a sensor with a 0.05 mm threshold. [Source: CNC deburring quality-control literature]
Steps: drag a fingernail (the nail itself, not the fingertip) across the edge at a steady speed, perpendicular to it, along the full length.
Pass: smooth all the way, no catches or clicks. Fail: a “click” somewhere — a burr or nick at exactly that spot.
This is worth stating plainly because it upgrades what many shops already do: the common habit is stroking the edge with a fingertip along its length, which mostly detects roughness. A nail dragged across the edge is far more sensitive to local defects — same hand, better instrument.
3.3 The cotton swab test (the fingernail, amplified)
Principle: more sensitive than a nail. Microscopic burrs and feather edges hook cotton fibers.
Steps: draw a cotton swab lightly along the edge, full length, like dusting it.
Pass: fibers intact. Fail: the swab snags or pulls fibers — a microscopic burr lives there. Invisible to the eye, but on the press it drags ink and prints a line. This is a prime suspect in “looks smooth but streaks anyway” cases.
3.4 The 10x loupe (replacing feel with sight)
Tool: a 10x jeweler’s loupe, a few dollars online.
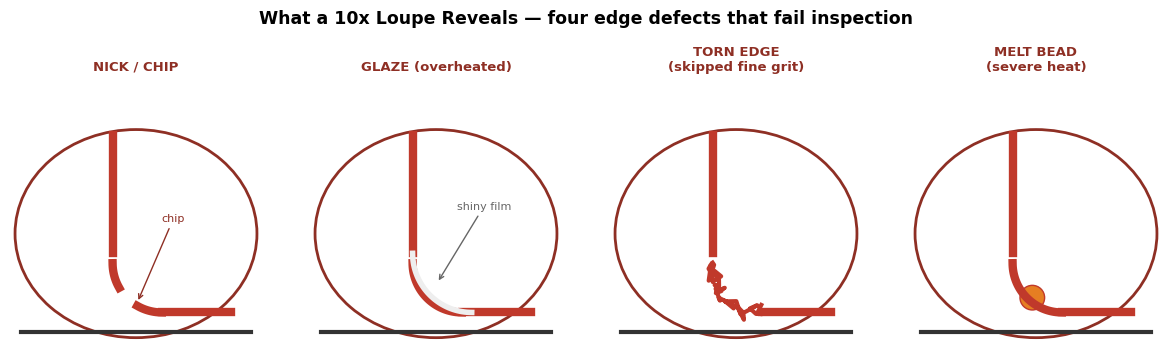
What to look for — four failure modes:
- Nicks/chips — small pits in the edge line (they print as fixed-position streaks)
- Glaze — a shiny, plastic-looking, heat-flattened edge: grinding overheated it. This layer is hard, brittle, and drags ink. It has to be ground off and redone.
- Torn edge — like the torn edge of bread: fine grit was skipped, or pressure was too heavy
- Melt beads — tiny balls on the edge: severe overheating
Post a magnified “good edge vs. bad edge” comparison photo next to the grinder — new operators check against the picture, not against someone’s memory.
3.5 Straightness (straightedge + feeler gauges)
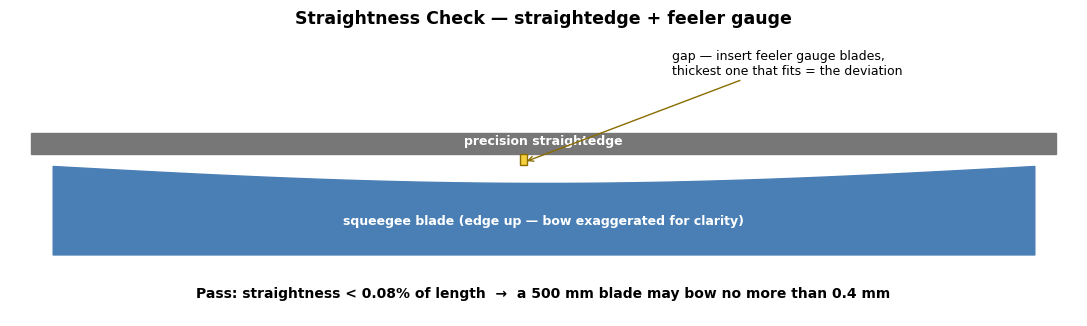
Pass criterion: edge straightness under 0.08% of blade length (from the ASGA squeegee quality standard). In plain numbers: a 500 mm blade may bow no more than 0.4 mm over its full length.
Steps:
- Lay the blade down, edge up.
- Rest a precision straightedge (or a verified-straight steel ruler) on the edge, along its length.
- Look for gaps against the light; where there’s a gap, insert feeler gauge blades.
- The thickest blade that slips in is the deviation. If a 0.4 mm blade fits, the blade is out of spec.
Feeler gauges are a go/no-go instrument — never force them in.
3.6 Height consistency (the 5-point caliper check)
Why it matters: uneven grinding pressure leaves one end of the blade taller than the other; on the press that becomes uneven squeegee pressure and uneven ink deposit across the print.
Pass criterion: within ±0.15 mm end to end. [Source: RB Digital sharpener specifications]
Steps: with calipers, measure blade height (edge to back) at five evenly spaced points — both ends, the middle, and the two quarter points. Record the five numbers. Max minus min ≤ 0.3 mm passes.
3.7 Hardness (using a Shore A durometer correctly)
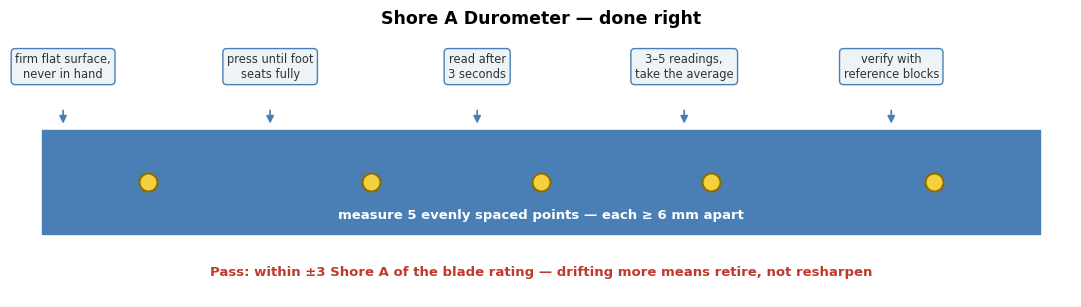
Many shops own a durometer, but most people use it wrong, and the readings are meaningless. The correct procedure [Source: DeFelsko / ZwickRoell durometer measurement guidelines]:
- Blade on a hard, flat surface — never in your hand, never on anything soft.
- Press the durometer straight down, steadily, until the foot seats fully on the surface.
- Read after 3 seconds — polyurethane creeps, so an instant reading and a 3-second reading differ. Pick one convention and stick to it.
- Keep measurement points at least 6 mm apart — each indent affects the next reading.
- Take 3–5 readings and average.
- Verify the gauge periodically with the reference blocks that came with it.
Pass criterion: measure before and after sharpening; readings within ±3 Shore A of the blade’s rating (factory tolerance is ±2–3 to begin with). Drift beyond that means solvent or heat has altered the material — retire the blade, don’t keep grinding it.
3.8 The press test (the final judge)
All seven checks pass? Mount the blade and print:
- No ink film left on the screen after the stroke (the blade wiped clean)
- No vertical blade lines on the print
Instruments verify the process; the print verifies the result. If the result fails, go back to 3.1 and start over — no exceptions.
3.9 If you have the equipment: edge radius
The industry has an objective definition of “sharp”: an edge radius under 0.25 mm — about three hairs thick. [Source: Screen Printing Magazine squeegee terminology]
Measuring it takes a profile projector or toolmaker’s microscope, which most shops don’t have; the combination of light test + nail + swab covers the same ground in practice. If your shop does have a vision measuring system, sample one blade a month and log the radius — that builds your own in-house “sharp baseline” over time.
The printable version
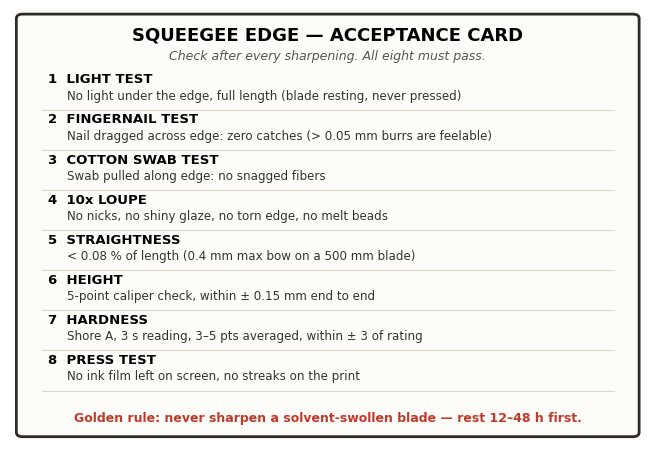
We’re doing exactly that in our shop: the card goes up by the grinder for a month, and we’ll compare rework rates between “fingertip sharpening” and “checklist sharpening.” I’ll update this article with the results.
When to Replace, Not Resharpen
Our practice has no fixed replacement schedule: a blade gets retired when repeated soaking and grinding leave it visibly deformed. RKS blades genuinely last — we tried domestic alternatives and the durability gap was obvious.
But deformation is a late symptom. Two earlier signals:
- Hardness drift beyond ±3 Shore A (the 3.7 method — measure before and after, it takes a minute)
- Melting onto the wheel or chipping during grinding (aged material)
Every sharpening removes 0.05–0.10 mm of height, and a blade lives through a few dozen sharpenings — the smaller each pass, the longer the blade lives.
Hand Sharpening Only: If You Have No Grinder
Full disclosure: we’ve never faced this — the grinder is always there. This section is for readers without one:
- The rest rule still applies. A swollen blade plus uneven hand pressure equals a wavy edge. Rest 12–48 hours first.
- Wrap the sandpaper around a flat block (wood, aluminum bar, a strip of glass). Paper held in bare fingers copies every bump of your fingers into the edge.
- Never skip grit stages. Coarse to shape, fine to finish; the 600 → 1200 combination above works as a reference.
- Stroke in one direction, steady speed — no sawing back and forth, no dwelling in one spot.
- A little thinner as lubricant is legitimate — the Japanese press maker Newlong documents a craftsman who hand-finishes blades with fine sandpaper wrapped around a can, katana-style, with results better than machine grinding [Source: Newlong column]. But let the solvent flash off completely before the blade goes near a press.
- Inspection doesn’t get easier just because the sharpening got harder — run all eight checks from section 3. Light, nail, and swab cost nothing.
- Know the limit. Hand work is for finishing and emergencies. A deeply damaged edge (nicks you can catch with a nail) isn’t coming back on sandpaper — replacing the strip is the rational choice.
Watch It Done
- Squeegee sharpening, belt grinder basics — KING PRINT (YouTube)
- How to measure Shore hardness with a durometer — PosiTector SHD demo (YouTube)
Sources
- ASGA squeegee quality standard — edge defect limits, straightness < 0.08%, hardness tolerance
- RB Digital sharpener specifications — ≤0.05–0.10 mm per pass, ±0.15 mm tolerance, aged-material warnings
- APOLAN technical literature — rest periods, two-stage sharpening
- Printing Industries of America — squeegee materials: rubber, neoprene, MDI-based polyurethane
- Hallprint — Vulkollan® is polyurethane made under Bayer license
- Screen Printing Magazine — squeegee terminology: “sharp” = edge radius < 0.010 in
- DeFelsko — how to measure Shore hardness (3-second reading, 6 mm spacing, averaging)
- CNC deburring quality control — fingernail threshold > 0.05 mm, cotton swab test, 10x inspection
- Newlong — craftsman hand-finishing case
Brand names (RKS, Vulkollan®) are mentioned for reference only; this site has no affiliation with any manufacturer. Everything not cited above is first-hand shop practice.
A companion guide on choosing squeegee durometer, profile, and blade type is in the works.