How a Squeegee Really Works: Pressure, Angle, Skew, and Peel-Off in Plain English
The four settings that decide every print — squeegee pressure, print angle, skew, and peel-off — explained with the actual physics, the working numbers, and the maintenance habits that keep a blade true.
Most guides tell you to “hold the squeegee at 70 degrees with firm, even pressure.” That’s not wrong, but it’s useless the day a print comes out blurry and you don’t know which knob to turn. This guide takes a different route: understand what the blade is physically doing — the four forces and angles that decide every print — and the symptoms stop being mysteries.
If you only remember one sentence: the squeegee is not a paintbrush, it’s a spring-loaded valve — it controls how much ink passes, where the ink releases, and how cleanly the mesh lets go. Everything below is just that idea, taken apart.
The Foundation: The Screen Only Touches the Shirt at One Line
Before any numbers, one picture. A screen on a press is NOT lying on the garment. It’s stretched in a frame with a small gap underneath — the off-contact gap, usually 2–4 mm. The only place screen and shirt meet is the thin line where the blade pushes the mesh down. Printers call that line of contact the point where printing actually happens.
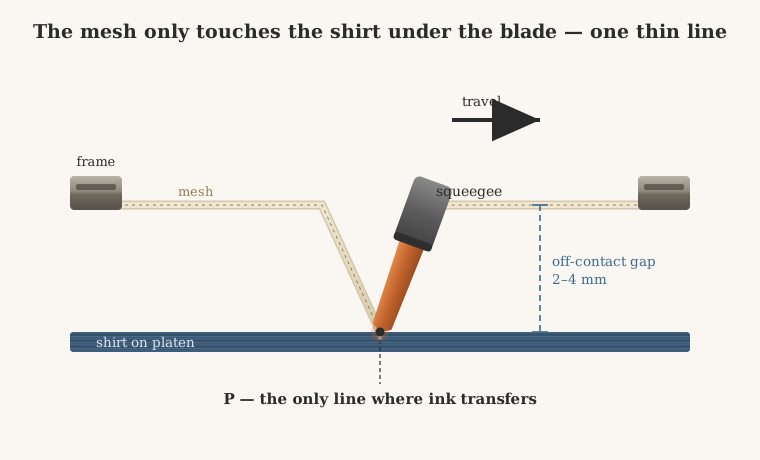
This is why the blade deserves to be treated as a precision part. When it presses, it doesn’t just push ink — it bends the mesh into a temporary wedge, and the mesh fights back like a spring. That spring is what peels the screen off the wet ink behind the blade. Lose that spring (low tension) or blunt the edge, and every setting downstream goes soft.
Force: One Push, Two Jobs (The Diagram Nobody Explains)
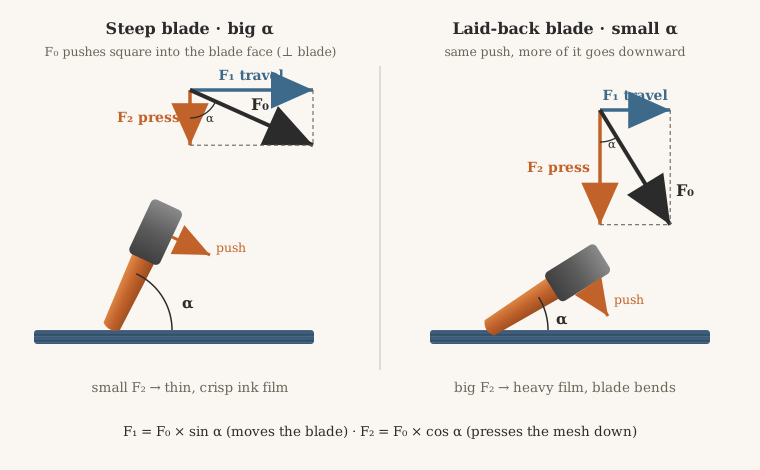
Here’s the classic textbook diagram, translated. When you push a tilted squeegee, your arm supplies one force — call it F₀. It doesn’t run along the blade; it presses square into the blade face, perpendicular to it. But the printing process needs two different things from that push:
- F₁ = F₀ × sin α — the part that slides the blade along the screen (the travel force)
- F₂ = F₀ × cos α — the part that presses the mesh down onto the shirt (the imprint force)
α is the angle between the blade and the screen surface. The split looks like this:
The practical punchline, in plain terms:
- Hold the blade more upright (big α) → less downward force → thinner, sharper ink deposit. Good for detail, halftones, thin inks.
- Lay the blade down (small α) → more downward force → heavier deposit — but the blade also bends, and a bending blade turns your “line contact” into a sloppy wide patch. That’s how you get fuzzy edges and worn-out blades and screens.
And the corollary that saves real money: if your prints look starved of ink, don’t just push harder — change the angle. Pushing harder at the same steep angle mostly bends the blade; laying the blade back a few degrees moves far more ink. Angle first, force second.
There’s also a ceiling on pressure worth knowing. Too little force and the mesh never reaches the shirt — no print at all. Too much and you get a bent blade (face contact instead of line contact), accelerated wear on both blade and screen, and a stencil that stretches and distorts the image. More pressure is never “free” ink — it always bills you later.
Print Angle: The Working Numbers
The print angle α — measured between the blade and the printing surface while moving — sets the deposit, as we just saw. The textbook ranges, which match shop practice:
- Flat work (posters, boards, flat garments): α ≈ 20°–70°
- Curved work (bottles, cups): α ≈ 30°–65°
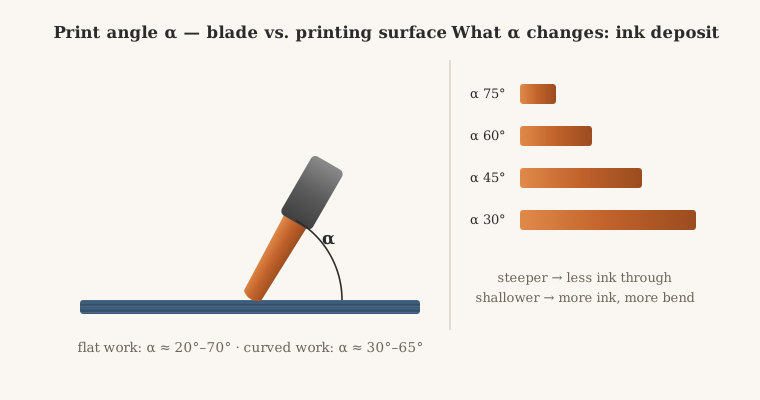
Why a range and not a number? Because the right α depends on blade hardness, ink viscosity, and the substrate surface. A soft 60-durometer blade at a shallow angle bends into a mop; the same blade steeper behaves like a squeegee again. Treat the ranges as the guard rails, then tune by a degree or two while watching the print — not by pushing harder.
Skew: The 6–8° Detail That Kills Streaks
Now look from above. The blade is a long straight edge, and it travels across the screen — but it should never be aimed perfectly square into the stroke. The angle between the blade’s length and the stroke direction is the skew, and the working value is a small 6°–8°.
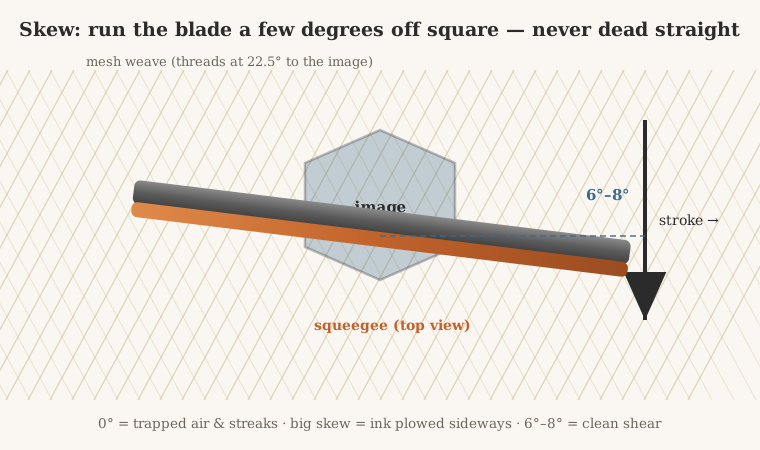
Why skew at all? Three reasons, all physical:
- Shear. Ink moves through mesh because the blade shears it. A blade dead-parallel to the stroke shears poorly — ink churns in place (an eddy) instead of flowing through the openings.
- Air. On the flood stroke, a square blade traps air in the mesh openings, especially over parallel lines in the artwork. Next print stroke, those bubbles become pinholes and broken lines.
- Vibration. On automatic presses, a square blade can catch and judder against the mesh weave. The small skew lets the blade climb over threads progressively instead of hitting the whole row at once.
So why not skew a lot? Because a heavily skewed blade bulldozes ink sideways — the print drifts, and one edge of the design gets starved. 6°–8° is the sweet spot: enough to cut cleanly, not enough to plow.
One pro-level alternative worth knowing: instead of skewing the blade, some shops stretch the mesh at an angle on the frame (angled mesh — the threads sit at 22.5° to the image edges, as in the diagram). Same physics, same goal — keep blade and mesh threads from ever running parallel — but the press setup stays square. If you fight moiré and sawtoothing on fine line work, that’s a chapter of our sawtoothing guide worth reading next.
Speed: Boring Is Beautiful
Whatever speed you print at, the one requirement is that it stays constant — because ink transfer happens in the moment the blade passes, and that moment has to be identical everywhere in the design.
- Uneven speed (fast-slow-fast, the classic tired-arm stroke) → ink bars: visible bands where deposit changed mid-print.
- Too slow → ink has time to seep sideways at the edges of the image; fine lines fatten, the print “grows.”
- Too fast → ink doesn’t have time to clear the mesh; deposit comes up thin and patchy.
On a manual press this is a body-skill: smooth stroke, same tempo every pull, no speeding up at the end. If you see banding that follows the stroke direction, check your tempo before you touch anything else.
Peel-Off: The Tug-of-War Behind the Blade
This is the part of the chapter that separates printers who adjust machines from printers who understand them.
Remember Fig. 1: the mesh only touches the shirt under the blade, at point P. Now watch what happens an instant behind the blade. The mesh, spring-loaded by its tension, has to peel off the wet ink film and snap back up. The point where it actually lets go — call it Q — should chase a few millimeters behind P as the blade travels.
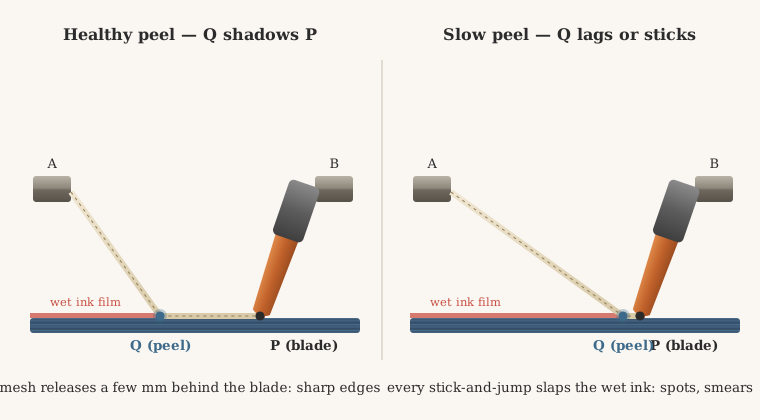
When Q lags, two failure modes show up:
- Q follows, but too far behind → the mesh drags through wet ink before releasing → smeared edges, ghost shadows beside fine detail.
- Q sticks, then jumps (stick-slip) → each jump slaps the mesh → spots and pocks in solid areas.
The physics of who wins. Two forces fight at point Q. The tensioned mesh pulls upward along its own slope — that force is QC, and only its vertical part, QC × sin α (α here is the angle the mesh makes with the shirt at Q), does the lifting. Holding it down is the ink’s own stickiness — its cohesion, QE. The rule of the whole game:
QC × sin α > QE → peel happens. QC × sin α ≤ QE → Q stalls.
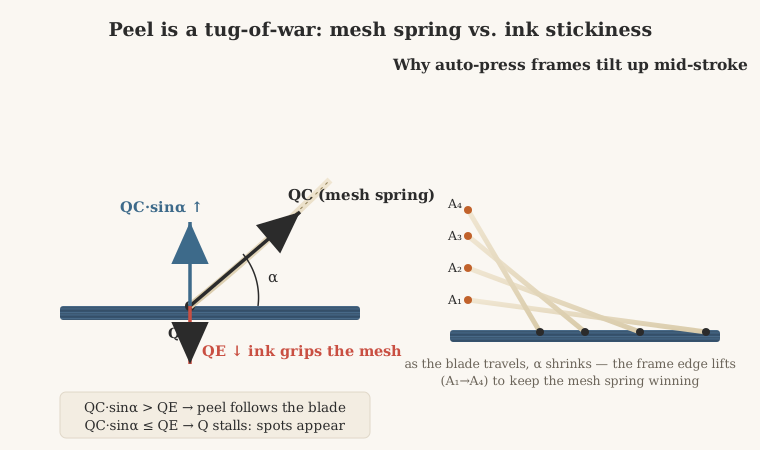
Now the subtle part that explains a machine behavior you may have seen: as the blade travels across the screen, the geometry changes — the mesh slope at Q gets flatter, α shrinks, so the peeling force weakens mid-stroke. Automatic presses fight this with a peel-off device that slowly lifts the back edge of the frame during the stroke (positions A₁ → A₄ in the diagram), re-steepening α to keep peel force ahead of ink stickiness from the first centimeter to the last.
What you can do about slow peel, in order of effort:
- Raise the screen edge slightly on the side where peel stalls — the textbook fix, re-steepening α at Q.
- Check tension. A tired screen has a weak QC — the spring is sprung. This is exactly what a tension meter catches before your prints do.
- Mind the ink. Ink that’s too cohesive (cold, over-viscous, or starting to gel) raises QE. See the multi-color note below.
- Don’t overdo off-contact. A bigger gap stretches the mesh into a longer wedge (AP + PB well beyond the flat AB length) — stronger peel, yes, but also size distortion in the printed image. Peel force and dimensional accuracy are traded against each other; that’s why off-contact is a 2–4 mm setting, not a crank.
The multi-color trap (especially in summer). When a second color prints over a first color’s wet film, solvents from the fresh ink soak in fast, viscosity spikes, and thixotropic inks start to gel the moment the blade passes. The previous film swells into a sticky gel that glues itself to the stencil. Peel too early or too weakly, and the mesh rips that gelled film back off the shirt — ruined print, baffling cause. Warm shop, fast colors stacking wet-on-wet, slow peel: that’s the recipe. The fixes live in the same four levers above — peel force, ink state, speed, and flash-curing between colors when the stack gets tacky (our curing guide covers flash technique).
Three Ways to Run Print and Flood (Pick One, Then Never Improvise)
Manual printers handle both the print stroke and the flood stroke with the same blade, and shops settled into three habits:
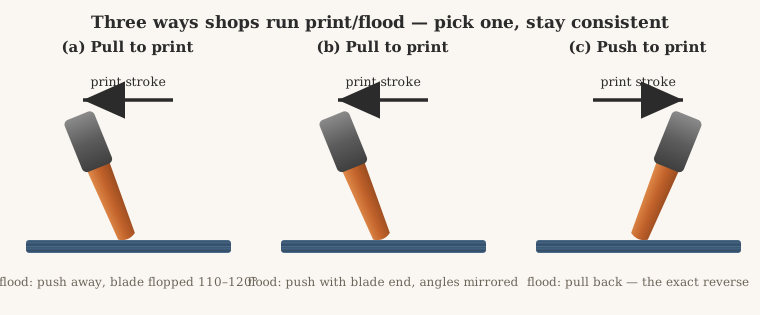
None of the three is “correct” — small parts and odd substrates favor one over another, and single-hand printing exists for small work. What matters for quality is consistency: whatever style you choose, the blade angle and pressure must come back identical on every stroke. A hand stroke can wander — the blade path curves, the angle drifts mid-stroke — and the print records every wobble. If you see deposit differences between the start and end of your stroke, it’s usually the arc of your arms, not the ink.
Keeping the Edge True: Sharpening and the Skirt
A blade edge is a wear part. Line contact plus friction plus solvent means every blade dulls and nicks — and every nick prints a streak along the stroke direction. Grinding restores the edge: coarse pass first, fine pass after, by machine when you can.
Hand-sharpening works if you build the simple jig: a flat board, a sheet of wet/dry sandpaper, and a guide wall to keep the blade dead vertical. One direction, steady pressure, no rocking.
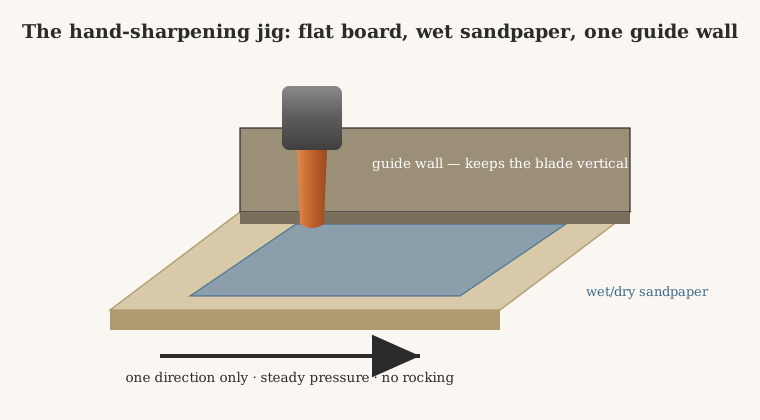
Two grinder’s details that separate a sharpened blade from a ruined one:
- Light pressure on the machine. Press hard and the edge comes out sawtoothed. If the rubber heats up and turns gummy mid-grind, dust the edge with talcum powder and carry on.
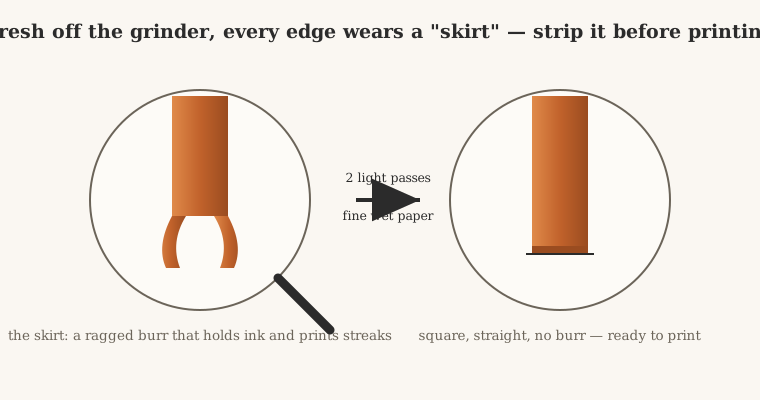
- Always remove the “skirt.” Fresh grinding leaves a ragged burr along the edge — the skirt. It holds ink, prints streaks, and tears off mid-run. Two light passes on fine sandpaper with a water rinse (the water cools the rubber and keeps grinding dust from clogging the paper) and the edge is square:
The glass test — because eyes lie. You can’t judge an edge by looking at it. The reliable check: coat a flat sheet of glass with a thin, even layer of ink, draw the blade lightly across it once, and read the trail it leaves. A true edge clears the glass in one clean sweep; every nick and low spot shows up as an ink streak left behind. We built a full acceptance routine around checks like this — light test, fingernail, straightedge, durometer — in our squeegee sharpening guide.
Daily Maintenance: Four Rules That Double Blade Life
- Before printing, check the edge — glass test or at minimum the light test. Thirty seconds.
- At every stop, wipe the blade clean with a lint-free cloth dampened in the right solvent. Never scrape dried ink off with an ink knife or spatula — one scrape puts a nick in the edge, and that nick prints a line on every shirt until you re-grind.
- Never let ink skin over on the blade. Dried ink crust both dulls the edge and breaks off into the next print.
- After washing, let blades rest. Rubber swells from solvent during a run; resting lets the solvent flash off and the edge shrink back to its true geometry. Rotate two or three blades through the week and each one lasts noticeably longer. Store them flat or hung — never standing on the edge.
Adapted from classic shop-floor practice and standard textbook treatment of squeegee mechanics; all diagrams are original.
FAQ
What angle should I hold the squeegee at? For flat work, somewhere in the 20°–70° range between blade and screen, tuned by a degree or two while watching the deposit — steeper for thinner, sharper prints; shallower for heavier deposit. Curved work (bottles, cups) lives around 30°–65°. If you need more ink, change the angle before you add pressure.
Why does my squeegee leave streaks in the print? Streaks along the stroke direction almost always mean edge damage: a nick, a burr, or a ground-in “skirt” left after sharpening. Do the glass test — coat glass with ink, draw the blade once, and read the trail. Nicks need re-grinding; a skirt needs two light passes of fine wet sandpaper.
What is squeegee skew and why does it matter? Skew is the small 6°–8° angle between the blade’s length and the stroke direction. A dead-square blade shears ink poorly, traps air in the mesh on the flood stroke (pinholes, broken lines), and can judder on automatic presses. Too much skew plows ink sideways. Keep it at 6°–8° — or stretch the mesh at an angle on the frame and run the blade square.
Why is my screen printing blurry on one side? Check peel-off first. If the mesh releases late or unevenly (the peel point lagging behind the blade), you get smearing and ghost shadows on the slow side. Raise that edge of the screen slightly, check screen tension, and confirm the ink isn’t gelling — especially wet-on-wet multi-color work in warm weather.
Does harder squeegee pressure mean more ink? Only up to the point where the blade starts to bend. Past that, extra force widens the contact line into a patch — fuzzy edges, distorted images, faster blade and screen wear. If the print looks starved, lay the blade back a few degrees instead: the force split (F₂ = F₀ × cos α) moves far more ink through angle than through muscle.
How do I know when a squeegee needs sharpening? Two signals: streaks in the print that follow the stroke direction, and a glass test that leaves ink trails. Don’t wait for visible damage — by the time an edge looks bad, it has been printing badly for a while.